Post Processing in Lightroom "My Work Flow" The 5 Step Tango
PRE-TANGO- Before you actually get to the Tango there are some things that you need to do and these are global corrections that correct the whole image not just a small portion of it. Lens Corrections and Chromatic Aberrations . In the Lens Correction section there is a check box for both of these that need to be checked. Lens Corrections correct the inherent flaws of what ever lens you were using and fixes them. Like lens distortion that is common with a specific lens. It also corrects Chromatic Aberrations that can be common with the lens. Camera Profile comes default at Adobe Standard but can be changed to match the type of photo and camera you are using. If your camera has different profiles like Landscape, Portraits it can be set here. If you create profiles you can also put them here. I have generic ones made for Sunny, Overcast, Flash ect...
TANGO! Step 1:White Balance and Crop- You need to set your white balance so Lightroom knows what colors to use like Sunny, Cloudy, Tungsten or a number in Kelvin like 5500 ect... You also need to crop so when Lightroom is doing the math to fix things it knows what part of the image to work on. Step 2: Auto (Undo:) That right Auto! I know Photographers don't like auto settings but Light room is a very powerful program lets see what it can do. If you don't like what Lightroom has done you can reset back to the way it was and do it manually or you can adjust sliders to your liking from where Lightroom has put them. If you want to do manually you need to follow step 3 and 4 . Step 3: Exposure,Clarity,Shadow,Highlights - Adjust these in this order! They are in the order for a reason because if you get out of order you may cancel out a correction you made previously. Step 4: Whites and Blacks - watch out for clipping of these Step 5: Vibrance and Vignette - Vibrance lightens and saturates colors that are not saturated in the image. Vignette darkens up the corners to bring the viewers eye closer to the subject of the image. POST TANGO: Post Tango deals with Sharpening and Noise reduction and all of the fine detail corrections that may need to be make like cloning out a dust spot or removing a blemish or using a filter. And that is pretty much it. Now I know that editing is very subjective and what works for one person doesn't necessarily work for another but this works for me. The most important thing to do in post processing is when you find a system that works STICK TO IT! You can still experiment and learn new things and incorporate into your work flow be but be consistent! And you will spend more time Shooting than on a computer processing! I have attached a video of me editing some photographs using Lightroom I am no expert at it but its just the way I do it. And it works for me maybe it will work for you too! Keep Shooting! Editing Video:- https://www.youtube.com/watch?v=yo4jpLC2rfo
What's in My Bag? Or Bags?
First my daily kit or bag that I take with me. This is the bag that I have with me almost every day. Its the bag that goes back and forth from work with me every day and goes with me on day trips like to festivals or where I'll be doing a lot of walking. First my bag is a Lowepro Fastback backpack 250. A great little bag with the camera compartment on the bottom of the bag and a place for other stuff in the top part. It has a camera access on the side for getting your camera out quick. It has a place for tripod and removable hip strap. It has a place for a 15" laptop and is a great day pack. So here's whats in my backpack. 1. Camera body, Sony A6000 2. Lenses- I carry 2 to 3 lenses all Sony. 16-50mm f3.5-5.6 ,18-105mm f4 , 10-18mm f4 3. Small Filter Kit- Variable Neutral Density Filter, Circular Polarizer, Soft Graduated Neutral Density filter, Stepdown rings. 4. Ultimate tripod Misc Stuff- iPod,Bluetooth,external hard drive, lens cloth,med kit,brush, comb, business cards,spare battery, cables, pens, markers and lots of other stuff. For my backpacking photography gear I use a Ribz front pack. I have gone through many configurations trying to get my backpacking kit honed in and its tough. In backpacking weight is the main concern on many decisions that you make because you have to carry everything on your back for many miles on rugged terrain and weather conditions. The total weight of my backpacking kit bag and all is about 5 lbs. My big boy camera with a 24-70mm lens come in at about 8 lbs thats without bag or accessories. So here's what I came up with. 1. Camera Body- Sony A6000 2. Lenses- Sony 10-18mm f4, Sony 18-105mm f4 3. Filter Kit- Circular Polarizer, Variable Neutral Density Filter, 3 Stop Soft Graduated ND Filter, Stepdown Rings for filters 4. Tripod- Trail Pix Tripod 5. Misc- Battery, remote release, lens cloth, extra SD card
My big boy bag is a Lowepro Flipside 500 AW 1. Camera Body's- Nikon D800, Nikon D7000 (both with "L" Brackets) 2. Lenses- Nikon 18-35 f3.5-5.6 G, Nikon 24-70mm f2.8G , Nikon 70-200mm f2.8G, 2X Converter 3. Filter Kit- Lee Filter System Holder, ND filters (2-8 stops) Soft Grad ND's, Hard ND, Polarizer,(Also carry Circular Polarizer filters) 4. Tripod- Depending on the situation I'll have a Manfrotto 458 Neotec, Flashpoint Carbon Fiber 5. Remote Shutter release 6. Head Lamp 7. Color Checker Passport 8. Cleaning Kit- Blower, Pen Brush , many lens cloths 9. Misc- Batteries(2), note pad, pen, Camera straps, SD and CF cards, Sensor Swabs, Emergency poncho, rain cover, Model Releases, Business Cards ect... Thats what's in my Bag's. Contents will vary depending where and what Im shooting. I've made some video's that you can link to below and see a more detailed of whats in my bag. Daily bag: https://www.youtube.com/watch?v=dhtjnxRuFEc Backpacking Kit: https://www.youtube.com/watch?v=Qzqq1rt47z0 Big Boy Kit: https://www.youtube.com/watch?v=Mwjz-h3iatI Remember camera's, lenses and gear are just tools that we use to do the job. You can get the job done with out all of fancy tools but it's easer with the correct tools. A carpenter can build a house without power tools but its a lot easer than just using a hammer and hand saw. Same with a photographer you can take and make great photo's with just a point and shoot. But its a lot easier with the correct gear. Its more fun too! Keep shooting !
Camping Cuisine! " Cooking on the Trail"
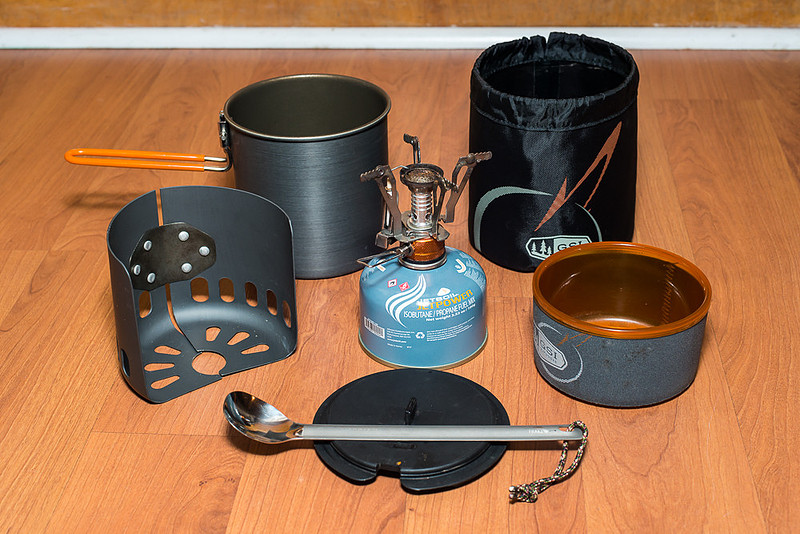
Food on the trail can be varied but for the most part most backpackers cook some sort of pasta, rice, or re-hydrate some sort of dehydrated meal. There are meals that are already dehydrated for you that you can buy or you can dehydrate your own. I'm just starting to dehydrate food but really am too new to talk on yet. The store bought ones taste great but a little pricy. And after hiking 10 miles Ramen noodles just dosen't cut it. So for me it was going to be dehydrated meals of some kind. First if your going to cook on the trail you'll need some kind of stove. The first rule in backpacking, I have learned the hard way, is that weight matters! So your stove will have to be lightweight and small. You could cook on a campfire right? Well you could if fires are permitted in the area you are going but it's not very convenient. You have to collect wood start fire (and art in itself) and then cook. What if it rains , what if it has just rained and everything is soaking wet? So cooking on a campfire although would work is not practical. There are homemade alcohol stoves that you can make out of a soda can (Youtube can show you how) and use denatured alcohol and cook on that. This does work and for many backpackers this is the choice. It is very lightweight and all you have to worry about is storing the alcohol. The drawback to me about this system is that it is slow and very wind resistant. If the wind is blowing you must have some kind of wind break or the flame will go out. You cannot control the flame its all or nothing. It takes maybe 9 min to boil water. The next type of stove is the type that I use , a propane stove. They are small stove and you do have to carry a small propane tank but they light quickly and you can boil water in about 3 min and you can control the flame! There are a few more like a fuel tablet that burns for about 10 min. I usually carry one for backup but they are messy for main stove. There are wood stoves that you feed small pieces of wood but flame control is hard. So propane is the stove I chose. Now your going to need some sort of pot. When I first started I used a old coffee pot that I had used for camping and it worked well. It was a little big and bulky and I had to find a way to remove the handle but it worked and the price was right. Free! The size of the pot that you will use can vary but you need one that will hold at least 2 cups of water. Most of the dehydrated meals need two cups of boiling water. As you can guess there are all kinds some made out of aluminum and some made out of titanium both materials are light weight. What about cups, bowls or something to eat off of. That's where the store bought kits come in. They make kits that have bowls ,cups and everything nest together (like those Russian eggs) and doesn't take up space. I got one that works great for me. It has a pot( teflon coated) with retractable handle, Lid with holes that so it can be a strainer, cup/bowl with insulation, and it all fits into a bag that is rubber coated so you can use it to carry water or a sink. You'll also need some sort of eating spoon with a long handle so you can reach into the bags of food and not get your hands in the food. Mountain House dehydrated meals are the most popular store bought meals but there are others that can be purchased. They come in many meals from Chicken and Rice, Lasagna , Chili Mac , Beef Stew. You can also cook pasta or more easily Pasta Sides, Ramen Noodles, Instant Mashed Potato's, for breakfast you can make Oatmeal using packets or just bring your own instant oatmeal. Before you go make sure you practice with your new cooking system because after hiking in many miles you don't want to fumble around trying to figure out how your kit works. There is a link below to a video that I've done to show the cooking process. I made this video while backpacking at Grandfather Mountain State Park on a solo trip I took not to long ago. Keep Hiking! and Keep Shooting!
Link to My Cooking Video : https://www.youtube.com/watch?v=MQqeqtdvrNg
Photo's: Top Left old coffee pot that I used to cook with with propane stove Top Right : Popular meals that are rehydrated on the trail counter clockwise from top Mountain House Dehydrated meal, hungry jack mashed potato's, Instant oatmeal, Ramen Noodles, Pasta Sides Bottom : My current cook set starting at the 1 o'clock postion and going clockwise container that holds my coolest also doubles as a sink, insulated cup/bowl, lid/strainer and long handled spoon, wind screen, pot, in middle stove with propane canister attached.
The Photographers Eye! How to See the world like a Photographer!
People often say you take good pictures or where do you go to get good Photos? The real answer is that good photographs are all around you everywhere you go, you just don't see them. You need a photographer's eye. What is a Photographer's Eye? Its looking at scenes and things like a photographer. That's kind of a intangible or teachable thing if you think about it. Photography is an art and we should look at scenes like an artist not as a technical problem like most of us usually do thinking of aperture , shutter speed ,what lens to use. When we should think about composition, Point of View (POV) or most importantly STORY! So how do we get that untouchable thing that "X" factor? Well this is how I do it. I look at a lot of photographs! Is that simple. If you look at good or great photographs, lots of them , before long you will start looking at situations , scenes like a Photographer would with a Photographers Eye. So where do we get great photographs to look at? Well long time ago it was in editorial magazines like Life, Look, National Geographic. But now we have the internet! There are many photographic sites that you can go to and just explore photographs upon photographs that are just amazing! A the end of this blog I'll leave links to all the sites that I use. The site that I use the most and post most of my photo's in is "Flickr". Flickr is a social media outlet for Photographs. You can like and choose photo's as your favorite. Flicker has all sorts of groups that you can explore and they have an "Explore" Tab where they post the top 500 photographs each day from all over the world and you will be amazed at some of these photo's. You can search by almost any topic and Flickr can find all of the photo's that are related or tagged as for example landscape, seascape , dogs, cats ect... Another site that I use is "500 PX" This site is much like Flickr and like Flickr it is a world wide site. You can search various photo's from all over the globe in various categories. This site has what they call "Popular" photo's and they are rated on how many views and likes and Favorites and selects the best photo's in each categorie every day. With these sites you can truly see some fantastic photographs and figure out how and maybe why the photographer chose the point of view or how they looked at the scene and in time you will start looking at everything different. Better! With the Photographers Eye! Keep Shooting! Link to Flickr: https://www.flickr.com Link to 500 PX: https://500px.com/login?r=%2Fflow The photographers eye by Lucas Vipieski Three Legged Monsters! "Tripods"
Tripods come in all sorts and sizes. They are made of all kinds of materials from aluminum , plastic, carbon fiber, even wood if you can find one old enough. Aluminum is the industry standard and there are many really good aluminum tripods. Carbon Fiber is the new kid on the block and they are lighter in weight with the same strength as their aluminum counterparts. I have many tripods most are aluminum and one is of carbon fiber. Aluminum is cheaper and for my money it is the best choice for most people. Unless you are carrying your tripod for long distances aluminum is the best choice in my opinion. As the saying goes "Size Matters". I personally have tripods that can reach as high as 7 feet and as small as 6 inches high. But not only size should be considered, the weight that the tripod can support. No matter what tripod you pick you must be able to support your most heavy camera combination. So if you just have a small point and shoot or mirrorless camera system a small tripod will do. But if you have a big boy combination with heavy lenses then you must go big. How your camera connects to your tripod is another thing you must think about when getting a tripod. We've talked about size, material, of the legs what about the tripod head that sit atop the legs of the tripod. There are many types of heads but the two basic design are Pan and Tilt and Ball Head. The pan and tilt head does exactly as it says it pans back and forth and tilts up and down. The ball head has a more versatile system where everything sits on a ball and can be moved in any direction and angle. I use the ball head for all of my tripods. Atop of the tripod head is the part that hooks up the tripod to the camera. Long time ago you just screwed the camera onto the mounting plate of the tripod head but that was a pain. Now they have quick disconnecting mounting hardware that a plate hooks to your camera and stays on and a mounting bracket hooks to your tripod head and with a quick move of a lever the camera is secure and with another move its off. There are a few styles of quick disconnects the industry standard is Arca Swiss but there are others like Manfrotto quick disconnects. I use a Arca Swiss type of bracket that is called an "L" bracket on all of my cameras. As the name suggest it is a bracket that is shaped like an "L" and fits your camera. The beauty of this bracket is that I can be taking a photo in Landscape and with a flip of a lever I can turn my camera to Portrait mode with out changing my tripod position. Believe it or not I have just skimmed the surface of the "Three Legged Monster" There are many things that we could talk about. For me the main thing I want to convey is that if you have a tripod and don't use it you should give it a try. Using a tripod can slow down your process and have you taking and thinking more about what your photographing instead of just the point and shoot mentality that we have gotten use to. Here are some photo's of different tripods and "L" Brackets. Video Link to Tripod Legs:https://www.youtube.com/watch?v=GDAYV4sqx2A Video Link on Tripod Heads:https://www.youtube.com/watch?v=ih_okFNx5sM
Keep Shooting!
On Left :From Left to right, Trail Pix Tripod Clamp, Arca Swiss Mounting Bracket and Plate, Table top Tripod with iPhone Adapter and iPhone, Nikon D7000 and Really Right Stuff "L" Bracket Below: Camera on Tripod in Landscape mode using "L" Bracket Below Left: Camera on Tripod in Portrait Mode using "L" Bracket
|